This tutorial is about USART in AVR ATmega32A Microcontroller. USART is most important and widely used peripheral while developing microcontroller based embedded systems. In AVR ATmega32A, We have built-in hardware support for USART peripheral. There are many systems such as controllers, sensors & other peripherals communicate with the microcontroller using USART. USART is not only use for the purpose of communication but it can also be useful while debugging. Since there is no display unit on microcontroller. USART can be used to see data on HyperTerminal/serial window of PC also check value of variable and registers at various stages of program.
The serial protocol is created many years ago. It was used by teletypes and terminals. The serial protocol used 2-wire, one to transmit data and other to receive data. In serial USART interface, sends the data in little blocks of one byte with one start bit and one stop bit’s.

The clock signal of serial protocol is implicit, this means that is “Joined with the data stream and there is no need to have separate wire to transmit the clock from one device to another. In this case we only need to specify the USART which clock speed we want to use (this is nothing but baud rate). And USART module will take care remaining things. In this tutorial we’ll be implementing USART in AVR ATmega32A Microcontroller. ATmega32A has built-in programmable serial USART and we’ll be demonstrating functionality using simple project. We’ll be sending string from microcontroller to PC. This could be cool example to communicate MCU and PC over serial cable. Also, it’s always good to have datasheet of ATmega32A in hand as it provides all information that we will need. [Refer Chapter No.19 and Page No:147-176]. 
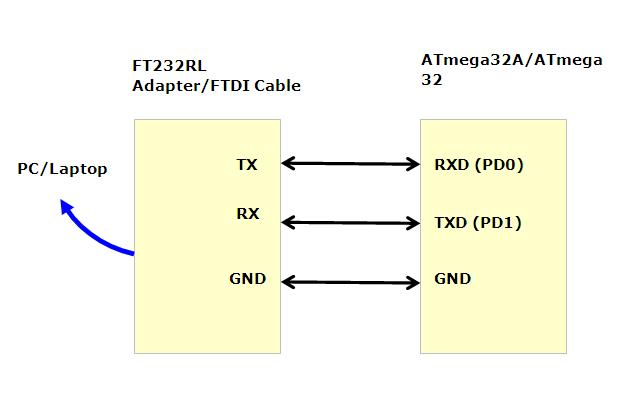
Now let’s have a look at the hardware pins associated to USART. The USART in AVR ATmega32A Microcontroller occupies three hardware pins.
- RXD– USART Receiver Pin (PD0 pin on ATmega32/ATmega32A)
- TXD– USART Transmitter Pin (PD1 pin on ATmega32/ATmega32A)
- XCK– USART Clock Pin (PB0 pin on ATmega32/ATmega32A)
We don’t have to use XCK pin as we’ll be using asynchronous mode of communication. The data will transfer at BAUD rate. Which we’ll set into UBRR Register. This is similar to UART operation. Don’t worry if you don’t get UBRR for the moment. We’ll discuss more as we go along explanation of code.
Here in this schematic, shows how to connect Microcontroller and FT232RL Adapter/FTDI Cable (USB-UART Bridge) with your PC. Remember TX of FT232RL Adapter is connected to RXD of microcontroller and vice versa.
Example: USART in AVR ATmega32A Microcontroller
Now talking specifically about USART module and how to create a program to use it. In this tutorial instead of just putting all the code together in the main function. We’ll instead create some basic functions, so if we want to use serial communication in another project. We just have to copy the functions and call them as and when needed. So in pseudo-code this is what we need to do:
- Start and Setup the USART
- Create a function to send a byte/char
- Create a function to receive a byte/char
- Make a simple echo program in our main routine
Here is a complete program/code. Later on in this tutorial we’ll slice down program into several pieces to get more inside view about what is happening in individual function.
Download Project: USART in AVR ATmega32A Microcontroller
/*
* Example: USART_AVR
* Target: ATmega32/ATmega32A
* Frequency: 16 MHz Fuse: LFUSE=0xFF HFUSE=0x99
* NOTE: Make sure to burn right fuse bits after loading USART_AVR.hex file to MCU.
* Remember Tx of FT232RL Adapter is connected to RXD and Rx connected to TXD of ATmega32A.
*
*/
#define F_CPU 16000000UL
#include <avr/io.h>
#include <util/delay.h>
#define BAUDRATE 9600
#define BAUD_PRESCALLER (((F_CPU / (BAUDRATE * 16UL))) - 1)
//Declaration of our functions
void USART_init(void);
unsigned char USART_receive(void);
void USART_send( unsigned char data);
void USART_putstring(char* StringPtr);
char String[]="Wel-Come to BINARYUPDATES.COM !!! \n\r\n";
int main(void){
USART_init(); // Call the USART initialization code
while(1){ // Infinite loop
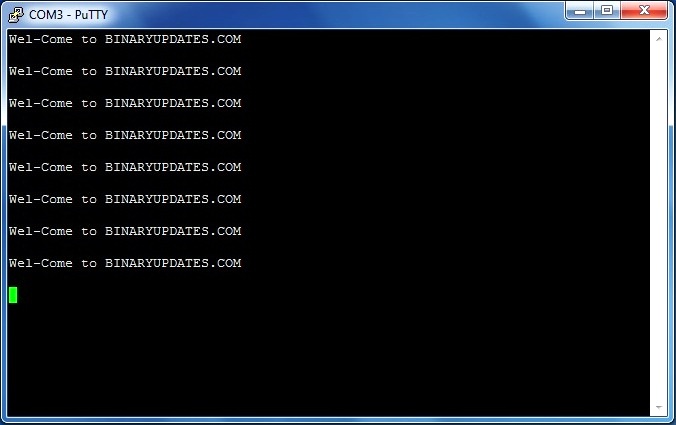
USART_putstring(String); // Pass the string to the USART_putstring function and sends it over the serial
_delay_ms(1000); // Delay for 5 seconds so it will re-send the string every 5 seconds
}
return 0;
}
/* Initialize USART */
void USART_init(void){
UBRRH = (uint8_t)(BAUD_PRESCALLER>>8);
UBRRL = (uint8_t)(BAUD_PRESCALLER);
UCSRB = (1<<RXEN)|(1<<TXEN);
UCSRC = (1<<UCSZ0)|(1<<UCSZ1)|(1<<URSEL);
}
/* Function to receive byte/char */
unsigned char USART_receive(void){
while(!(UCSRA & (1<<RXC)));
return UDR;
}
/* Function to send byte/char */
void USART_send( unsigned char data){
while(!(UCSRA & (1<<UDRE)));
UDR = data;
}
/* Send string */
void USART_putstring(char* StringPtr){
while(*StringPtr != 0x00){
USART_send(*StringPtr);
StringPtr++;}
}
| NOTE: one thing to be noted that we have to use 16 MHz external crystal with ATmega32A to function this code properly. And we have to burn fuse bits LFUSE: 0xFF and HFUSE:0x99 after downloading hex file. |
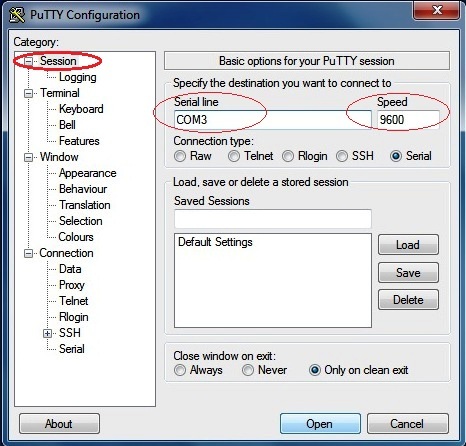
Configure PuTTy for Serial USART and hit on “Open”. We’ll get received data on screen from Microcontroller
Let’s have a look into the code; apart from few lines in a beginning of source code (some include statements and macros).
void USART_init(void){
  UBRRH = (uint8_t)(BAUD_PRESCALLER>>8);
  UBRRL = (uint8_t)(BAUD_PRESCALLER);
  UCSRB = (1<<RXEN)|(1<<TXEN);
  UCSRC = (1<<UCSZ0)|(1<<UCSZ1)|(1<<URSEL);
}
Lets explain what all those strange name means UBRRH and UBRRL are registers where we set baudrate but not directly, in this two register we put values that corresponds to the baudrate that we want to use (for example 9600) and CPU (crystal) frequency. To calculate those values there are two ways, one is to read the table provided in the datasheet (in USART section near the end) or use little formula that was used to generate those value present in datasheet. In this program we have used #define and have compiler to do all math’s. We can just change the baudrate value and recompile the code so don’t have to read the datasheet every time when we want to change the baud rate.
Now about UCSRB is the register that control if Rx(receive, this is the one activated by RXEN bit) and Tx(transmitter, this is the one activated by TXEN bit) also this is where we can enable interrupt associated with USART. And UCSRC is the register that has some more configuration bits. These bits are protocol specific. This is where we configure data bit length, parity check and number of stop bits. We recommend reader to leer with datasheet and find out more. To initialize USART in AVR ATmega32A we need to call USART_init() function and that’s it. Now let’s move further from initialization of USART.
unsigned char USART_receive(void){
  while(!(UCSRA & (1<<RXC)));
  return UDR;
}
In the first linethe while loop is used to check if there is data is available in buffer, we return the data. If new data comes in,the previous one will be lost so the point is that wait until the RXC (bit no.7) in UCSRA is SET and then read the UDR register of the USART.
void USART_send( unsigned char data){
  while(!(UCSRA & (1<<UDRE)));
  UDR = data;
}
The first line is a bit odd, but it is a reason that the line is checking whether there is space in ATmega transmit buffer. Everytime the USART gets its data from buffer thus making it empty it notifies to the CPU by telling UDRE (USART Data Register Empty). It does this by setting a bit (UDRE bit no.5) in UCSRA register. The ATmega chip has small 3 byte hardware buffer in the Tx/transmit channel. To put new character/byte, if yes the character/ is byte is loaded into UDER register which makes a part of USART hardware and if something is loaded into that buffer register it will be sent by USART, again this is very simple with only two lines. We can already sent data using the serial port.
void USART_putstring(char* StringPtr){
  while(*StringPtr != 0x00){
    USART_send(*StringPtr);
  StringPtr++;}

}
Here in this function we’ll look at how to send string via serial communication. This is useful function because there are plenty of situations where we need to send much more than one byte/char so we build USART_putstring function to help us. This function takes advantage of the fact that in C every string is terminated with a null character this means that the last char is always ‘0’, so using this USART_send function we make it work and successfully sent string ‘Wel-Come to BINARYUPDATES.COM’ to PC over serial communication. This is how you can use USART in AVR ATmega32A Microcontroller to establish communication between PC and microcontroller system. If you have any question then please feel free to drop comment. Thanks.