In our previous post, we have seen how to create fresh new project using Keil uVision4 to program LPC1768 Microcontroller. Here we’ll do something a bit more interesting and show you the most basic method for actually making your microcontroller interact with a physical world by programming GPIO port pins. Let’s Blink LED with LPC1768 Microcontroller before we proceed, keep in mind that we have upto 70 general purpose I/O pins in LPC1768 Microcontroller. GPIO or General Purpose Input Output, is the easiest way for you to interact with basic peripherals like LED, Switches and other basic components.
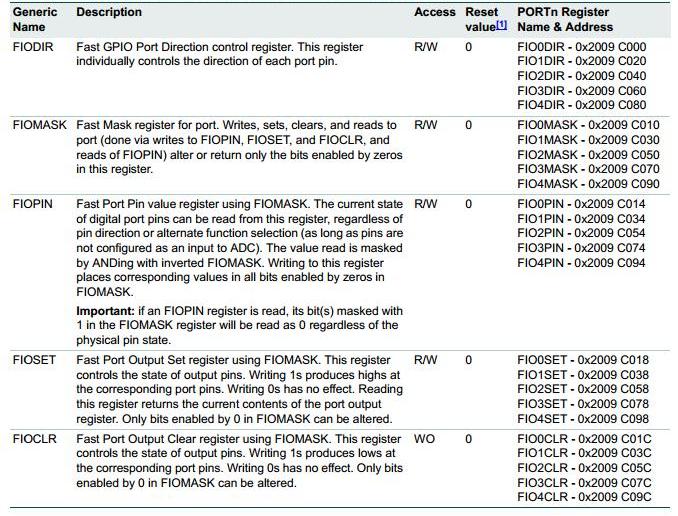
The GPIO ports can be used as input or output. It can also be used for more complex peripherals like character or graphic displays but for now we’ll start with a basic component like LED. This is relatively ease to get working. In order to get started with GPIO you need to understand registers like FIODIR, FIOSET, FIOCLR etc. which controls GPIO port pins. Please read [Chapter 9 from User Manual, Page No. 131, Table 102].
Now let’s go through the register used for GPIO programming
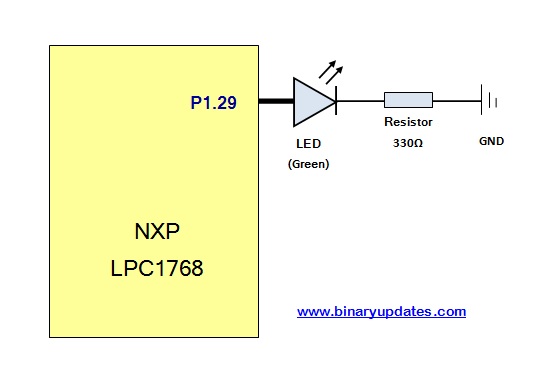
Example Project: Let’s hook up an LED to pin P1.29 of LPC1768 Microcontroller as shown in circuit diagram. Here I am using ARM-LPC1768H Header board which has on board LED connected to P1.29 pin of Microcontroller. In case your board doesn’t have LED then connect externally.
While writing an application to blink LED we have to follow general steps,
- Initialize a microcontroller system, which take care setup procedure like powering up peripherals, set clock rate etc.
- Connect necessary pins using pin connect block. The purpose of pin connect block is to configure the microcontroller pin to desired function.
- And then set or clear the bit of respective pin to turn ON & OFF LED.
Let’s have a look at program which controls LED at P1.29.
#include "lpc17xx.h"

int main (void)
{
	uint32_t j;

	SystemInit();

	LPC_GPIO1->FIODIR |= 1 << 29;			// P1.29 = Outputs
	LPC_GPIO1->FIOCLR = 1 << 29;			// Turn-OFF LED

	//Loop LED Test
	while(1)
	{
		LPC_GPIO1->FIOSET = 1 << 29;		// Turn-ON LED
		for(j = 10000000; j > 0; j--);
		LPC_GPIO1->FIOCLR = 1 << 29;		// Turn-OFF LED
		for(j = 10000000; j > 0; j--);
	}
}
To Download Project Files: Click Here
This program flow is not very difficult to understand. As it only have few lines of code. Let me slice down into pieces.
SystemInit ();
This function call is used to initialize the microcontroller system. Typically, this function configures the oscillator (PLL) that is a part of LPC1768. SystemInit () is called from “startup_LPC17xx.s” for systems with variable clock speed, it updates the variable SystemCoreClock.
LPC_GPIO1->FIODIR |= 1 << 29;
This line just simply configures direction for Pin P1.29 into output mode. Since we are driving LED at this pin.
LPC_GPIO1->FIOCLR = 1 << 29;
Here we clear bit at P1.29 port pin to keep LED turned OFF in the beginning of application.
while(1)
	{
		LPC_GPIO1->FIOSET = 1 << 29;		// Turn-ON LED
		for(j = 10000000; j > 0; j--);
		LPC_GPIO1->FIOCLR = 1 << 29;		// Turn-OFF LED
		for(j = 10000000; j > 0; j--);
	}
This never ending loop simply set and clears the bit at GPIO port pin P1.29 which turns LED ON & OFF. There is simple for loop which generates a delay of around 1 second. This software generated delay is not accurate & reliable but for this simple application, I don’t mind to use. In future tutorials, we’ll look at how to generate more accurate delay using timer and interrupt feature. This is it ! for this tutorial.