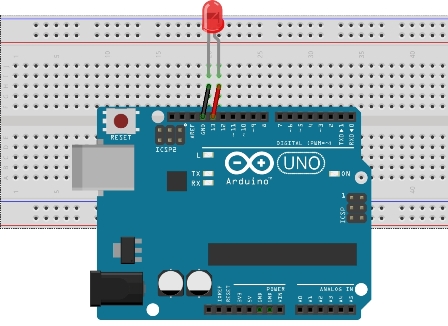
This tutorial is about the programming of GPIO Pins. Here we will explore how to interface LED and Switch with Arduino Uno. Arduino Uno has 14 digital I/O Pins which will be referred as GPIO. Now in this tutorial, we have presented two examples. One in which we will connect LED to PIN 13 of Arduino and blink it after every second. And later on, we will use PIN 7 to configure as input and learn how to interface switch to control the LED.
Program Blink LED with Arduino
// the setup function runs once when you press reset or power the board
void setup() {
  // initialize digital pin LED_BUILTIN as an output.
  pinMode(13, OUTPUT);
}

// the loop function runs over and over again forever
void loop() {
  digitalWrite(13, HIGH);   // turn the LED on (HIGH is the voltage level)
  delay(1000);              // wait for a second
  digitalWrite(13, LOW);    // turn the LED off by making the voltage LOW
  delay(1000);              // wait for a second
}
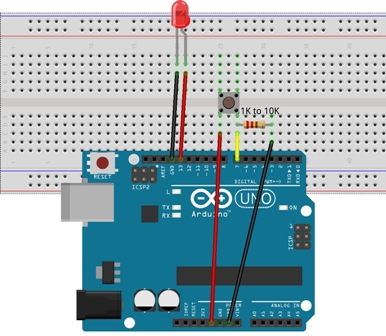
After connecting LED and configuring Arduino pin into OUTPUT mode. Now It’s time to learn how to configure Arduino Pin to INPUT Mode. Let’s add button switch to our previous project and turn LED ON/OFF using Switch. In this example project we have to connect LED to PIN 13 of Arduino. The Switch will be connected to PIN 7 of Arduino. Make sure while connecting switch we will have to use pull up resistor of value 1K to 10K. The reason is because it’s an active low pin. Here is a circuit connection we need to do before uploading the sketch.

Program Switch to Arduino Uno
#define ledPin 13 // choose the pin for the LED
#define switchPin 7 // choose the input pin (for a pushbutton)

int val = 0; // variable for reading the pin status

void setup()
{
  pinMode(ledPin, OUTPUT); // declare LED as output
  pinMode(switchPin, INPUT); // declare pushbutton as input
}

void loop()
{
  val = digitalRead(switchPin); // read input value
  if (val == HIGH)
  { // check if the input is HIGH (button released)
    digitalWrite(ledPin, LOW); // turn LED OFF
  } else {
    digitalWrite(ledPin, HIGH); // turn LED ON } }
  }
}
This is how we can interface LED and Switch with Arduino Uno. In next few tutorials, we’ll explore the use of GPIO pins to serve different purposes. We hope you’ll enjoy working with Arduino as it’s very easy to use hardware. If you have any question regarding code or circuit connection feel free to leave a comment. Thanking you.